9 Tips to Effectively Organize Your Schedule Using Apple Calendar

With an upcoming busy week on my plate, I decided to write down all my tips and tricks for using your calendar effectively. I’m very adamant about using my calendar because it helps me feel less stressed and I can plan out my week better. I even incorporate a little bit of mindfulness in the way that I use my calendar.
-Make Recurring Events
I put re-occuring events in the calendar even though my brain is used to the things happening at a certain time. Before each semester, I put every class on my calendar. This helps me out when I’m scheduling non-regular appointments like doctor’s visits or running errands. During the first week of the semester, it’s also helpful to have my classes in the calendar since I’m adjusting to my new schedule.
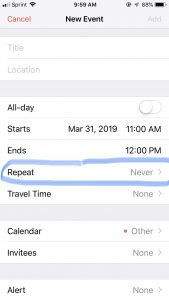
To make a re-occuring event:
- Hit the plus sign on the top right of the screen or hold down on the calendar to make an event
- Click Repeat
- Then choose the best option (daily, weekly, biweekly, monthly, or yearly)
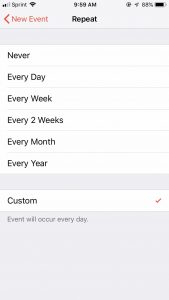
*When I’m putting my classes in the calendar, I’ll schedule by the day and hit to repeat weekly. It’s a tedious activity, but it really helps me in the long run.
-Add the Location of the Event
Adding the location of the event is not only helpful for your brain in the case of non-regular events, but you can also receive notifications about how long it will take you to get to a certain location. If you’re like me and you like like to believe that you have more time to get to a certain place then you actually do, this is really helpful. Another benefit of adding the address is being able to get directions right from your calendar app if you click on the address within the event.
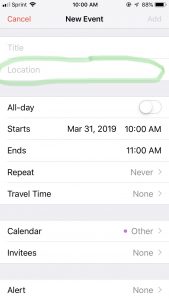
To add the location:
- Plus sign or hold down
- Under the name of the event, you can enter the location
- At this point, it’s best to add the actual address of the place because your phone will send you a notification when it’s time to leave (your phone will account for travel time and any traffic)
- If you’re in college, you can add the building and room number of your class (you might not be prompted for travel time in this case, but it’s helpful the first semester of new classes).
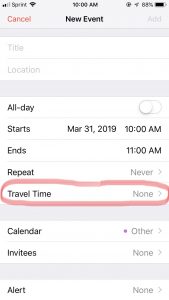
-Add Travel Time Manually
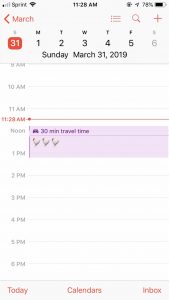
Like I said in the last point, if you’re entering a building and room number, you might not be prompted for travel time, but there’s actually a way to do this without an address. Another case in which you might need/want to add a travel time is if you need to get to an event early. For example, I’m a musician so it’s customary to get to rehearsal at least 10 minutes before the rehearsal actually starts so the address travel time might not be helpful for me. The benefit of adding travel time manually is you will see your travel time marked on your calendar above the event with a little car icon (allowing for better planning!).
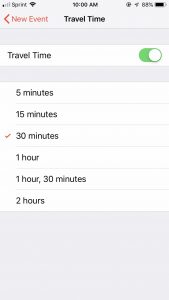
Adding travel time manually:
- Plus sign/hold down
- Scroll down to travel time and turn on
- Select the option best for you (this can be based on location to include car or walking time or you can select anywhere from 5 minutes-2 hours)
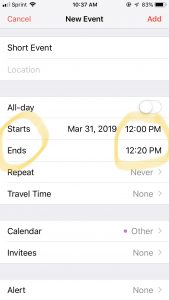
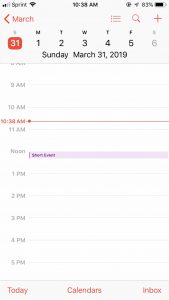
-Add All Events to the Calendar Even if They’re Short
Even if an event only takes fifteen minutes (like a quiz or very short meeting), I always add it to my calendar so I can remember that the event is happening and I can better conceptualize my time.
Adding short events:
- You probably know this, but you can edit the time an event lasts when you schedule it under start and end.
- But seriously, don’t get lazy and leave the automatically scheduled hour if a short event isn’t going to be that long.
*If you’re looking to schedule a reminder, I would recommend using the Reminders app instead of making a microscopic event in your calendar
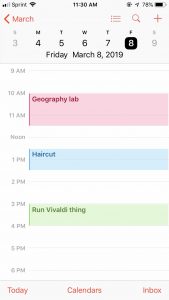
-Categorize Events
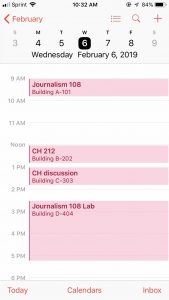
Categorizing your events isn’t going to change your life, but I like to do this to add a mindfulness aspect to my calendar. When I’m looking at an overview of my day or week, it’s nice to conceptualize how long I’m going to be working, going to class, sitting in music rehearsal, or actually doing things for me (like hair appointments, spending time with my boyfriend, etc.).
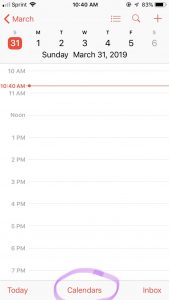
To make categories:
- At the bottom of your screen, click calendars
- Scroll down to icloud
- Here you can edit your category names and colors of each category by clicking on the i symbol
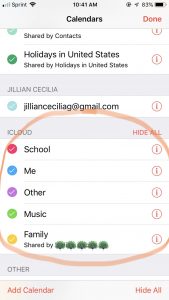
*My categories are school, me, other, and music (there is also an icloud family category if you’re virtually connected with your partner or family and the events in this category will show up on the whole family’s calendar, but I don’t really use this category)
Using the categories in action:
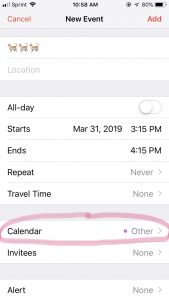
- When you’re making a new event, you can choose the category by selecting “calendar” and then the appropriate calendar
- The cool thing about categories is you can easily edit then without hitting the “edit button in the right hand corner. You can just scroll down and click calendar to change the category
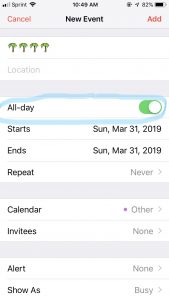
-Schedule All Day Events
This is another tactic I use to add mindfulness to my calendar. Things like vacations, breaks from school are times I really look forward to so I like seeing them in my calendar (and it’s helpful knowing the exact dates of things so I can plan around them if need be.
To Schedule All Day Events:
- This one is easy. When you create an event, under location, turn on “All Day” and it will eliminate the start and end time.
- From here, you can leave it as a single day or a expand the event to a span of days if it’s a vacation, break, or you have some sort of house guest visiting
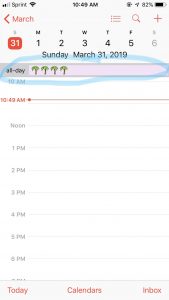
*The benefit of scheduling all day events is not having to deal with start and end time. The all day event or span of days will show up on the top of the calendar when you’re looking at it in a daily or weekly view.
-Delete Recurring Events When Necessary
I always make sure to delete my classes on holidays to conceptualize my “time off” (more mindfulness 😀 ). It’s also helpful to delete other events right when they’re cancelled (especially if they’re far out) to make sure you don’t forget and accidentally waste your time going somewhere you don’t need to be.
To delete recurring events:
- Click on the event
- At the bottom of the screen, hit delete
- From here, you can can “delete this event only” or “delete all future events” and select the appropriate option
*When I’m putting my college classes in my calendar before the semester starts, I like to schedule their ending time as well so this is where you would click “delete all future events”
**To all you anxious people, I see you! and I know what you’re thinking “Will “delete all future events” literally delete everything I ever scheduled in my calendar even though that’s super unlikely and irrational?” The answer is no. “Delete All Future Events” will only delete the specific recurring event you’re editing. I promise.
-Actually Use Your Calendar!
You worked so hard adding recurring events and implementing my other tips, reap the benefits of your hard work! When you schedule something, don’t assume that you’re going to magically remember it. Put it in your calendar so you have one less thing to worry about. Seriously, you’ll save yourself so much unnecessary stress.
-Review Your Calendar at the Beginning of Each Week
Every Sunday, I take a couple minutes to look over my upcoming week so I know what’s on the horizon and there won’t be any surprises later on in the week. Reviewing my calendar also helps to calm my pre-week Sunday anxiety.
Other Tips:
*I don’t personally use these last few tips, but you may find them helpful
-Add Alerts
When you’re making an event or when you click on it, click on “Alert” and you can opt to receive a notification anywhere from 1 week to the time of the event. You may find an alert helpful if it’s an out of the ordinary event.
-Add a Second Alert
If you hit edit in the right hand corner of an event or when you’re making a new event, you can choose to receive a second alert. For example, you could recieve your first alert a week beforehand and a second alert the day before. Whatever works for you!
-Schedule Events in Your Calendar to Plan Non-Events
If it helps you, block out time in your calendar to plan things like doing homework/working from home, running errands, or going to the gym. My recent goal has been to go the gym twice a week. I’ve had no trouble achieving this goal because I can fit it into any of my school days easily, but I’ve thought about just putting it in my calendar to decide exactly which days I’m going which would eradicate unknown factors in my week or be more clear on busier weeks. But like I said, I haven’t tried this yet.
I hope these tips help you effectively use your Apple calendar! If you have any more calendar tips and tricks for me, leave them in the comments section below 🙂
Outfit Details:
Body Suit:
ASOS Parisian Polka Dot Wrap Body (on sale for $26)
Body Suit (similar):
ASOS DESIGN Wrap Body ($40)
Jeans:
721 High Rise Skinny Jeans in cast shadows-dark wash ($60)
Jeans (similar)
BDG Twig High-Rise Skinny Jeans (on sale for $40)
Boots:
DSW Marc Fisher Leave Bootie ($60)
Boots (similar):
Rach | 6th Apr 19
These are great and very helpful tips!
http://www.rdsbsessions.com
Jill Gilbert | 6th Apr 19
I’m glad you enjoyed them! Thank you for reading 🙂